
Hey there, friends!
Tuesday was the last day of my hubby's three week "vacation"...and I say that loosely because there wasn't much relaxing going on. We purposely put our nose to the grindstone and dedicated the days to getting this place painted, as well as finishing up some other long-put-off job.
One of those put-off jobs was sewing up a roman shade for our bedroom.
I LOVE me some roman shades. If I could (and hopefully eventually I will), I would have them on every window in the house and do away with those dust collecting mini blinds forever.
The problem here lies solely in finding a good block of time where I can sit down uninterrupted and sew away. Our little renocation (I'm stealing the word from a friend cause I think it's brilliant) provided the perfect opportunity.
I thought while I was at it, I'd take pictures and write up with a "how-to" for any of you who might be interested in tackling some shades of your own.

Still with me?
Good.
There are a LOT of pictures...you've been pre-warned! When I learned how to make them, all I had was a bit of chicken scratching and a rough sketch to go by. I would have loved some really clear instructions, so I've tried to do my best here for you.
These shades are not difficult to make, they just require some time and patience.
And hey...in the end you'll have a beautiful custom shade that fits perfectly and matches exactly...for a fraction of the cost. Can't beat that, right?!

First you'll need to purchase your supplies - obviously!
Figure out the measurements of you window and make sure the fabric you choose is wide enough.
I typically buy 1.5 meters (roughly 1.7 yards) and I always have enough to cover a standard window.
- Drapery lining same amount as fabric (I usually use a light blocking liner)
- tube tape (width of window x 5)
- nylon cord (length + width + 1/2 length x 5...I explain this more below)
- 1.5" velcro
- cleat
- circle screws (5)
- cord drop
- slat (width of window)
- 1/4 " dowels (5 - width of window)
1" x 2" board (width of window)
- staple gun
- staples
If you've never heard of some of these items, don't worry, the pictures will better explain what you need to look for...keep reading!

First off, give your fabric a good ironing.
A crisp press makes a sewing project sooo much easier!
I always press both the fabric and lining.

Measure the width and height of the inside of your window where the shade will be hanging.
My window measured exactly 46" x 46".

Then, cut out your fabric adding 1/2" to each side and 4" to the length.
I cut my fabric out at 47" x 50".

Now take your lining and mark out your measurements for the tube tape (show below) with pins.
The first row of tape should be 5 inches from the bottom. The next row should be 8 inches up and repeat with three more rows 8 inches apart.

Tube tape is a fantastic product that has little loops along the top of the tape for running nylon cord through (as shown above) and a pocket along the bottom (shown below) where you can insert a dowel. If you are still unsure of what you are looking for, ask for tube tape used for roman shades at your fabric store and they should hopefully know what you're looking for.


Now it's time to pin down the tube tape. Pin the tape to the right side of the lining and start at the bottom.
You have already measured out five inches and marked it with a pin. Pin your tape down with the bottom of the tape right above the marking pin (as shown above). Keep measuring as you pin your tape across the width of the lining, making sure you are keeping the tape straight.

Lay your next row of tape down, once again above the pin marking (refer to above photo).
As you work your way across, pinning the tape down, measure 8" from the top of the tape to the top of the tape below and you will be able to make sure you are continuing to pin in a straight line.

Continue laying out and pinning your rows of tape until you have five rows completed.
After my fifth row of tape, I had about 13" of fabric left. This is the way it should be!
You don't want to go too close to the top of your fabric or things will look very wonky when you're at the finishing stages!

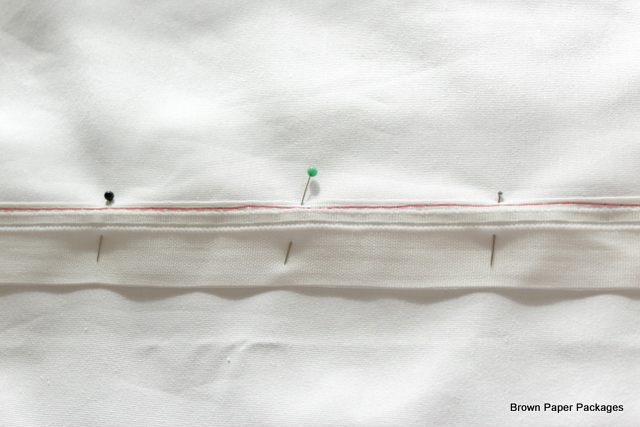
Now baste your tape onto the lining. I used a bright colored thread in this tutorial for demonstration purposes, but you certainly don't have to. Just make sure when you are basting, that you stitch right along the top of the tape and avoid stitching over the little loops.

Now it's time to stitch the lining to the fabric!
Pin right sides together, and stitch the sides and bottom together with a 1/2" seam, leaving the top open.
Trim the bottom corners and flip right side out, making sure the corners are neatly pushed out. You're going to feel like a professional seamstress when you see your shade coming together!
Press the edges of the shade out flat.

Now you need to find a slat of some sort to push into the bottom of your shade.
I have used different materials for this with the various shades I've made. The main thing you need to look for when choosing a slat, is that it is sturdy yet slim. I have used gardening stakes before, but for this particular shade, Hubs had some plastic slats from an old mini blind hanging around, and it worked perfectly! It was flexible and yet wouldn't break - which is something you need to watch for if you use a wooden slat. If it is too thin, it can snap. I would say a 1/4" thickness would be perfect. The width of the slat should not be greater than 1.25".

Slide the slat between the fabric and lining down to the bottom of the shade.
Now you will need to stitch a pocket to keep the slat in place, which you can do either by hand or by machine. For this blind, I used a zipper foot and stitched with the machine. This is by far the most challenging step (if done by machine) as you need to make sure you are far enough away from the wall to accommodate the slat sticking out behind you and in front of you, as you stitch.
Stitching by hand will alleviate this problem, but it does take longer.
Time to stitch the tape again! This time you'll be stitching through all the fabric so make sure your top thread and bobbin thread match the fabrics! (Bobbin thread should match the shade fabric and top thread should match the lining.) Once again, pin the tape and fabric together, making sure everything is smooth and flat.

Now you will carefully stitch in the "ditch", as you can see in the above picture.
This will eliminate any chance of accidentally stitching the loops shut.
I suggest pinning and stitching one row at a time, removing the basting before continuing on to the next row.
This way you can be sure to pull the fabric smooth between each row and ensure a better finished product.
Now the shade part is complete! Yippee! You did it!
Give yourself a pat on the back!

Now you will need your 1" x 2" board - measured and cut to fit inside the width of the window (ours was 45.75"), dowels, circle screws, velcro, nylon cord and cord drop.

Using leftover fabric, "upholster" the 1" x 2" board. To be honest, this part is optional. The shade will work just fine without covering the board...it just won't look as nice!
At any rate, if you choose to cover it...wrap it much the same as you would wrap a gift...just use staples instead of tape!

Tuck those ends in and staple them neatly too!

Now staple the "hook" side of the velcro to one edge of the board.
In this example, we stapled the velcro right over the staples fastening the fabric underneath, so everything is neat and tidy.

Now you will need to stitch the "loop" part of the velcro to the lining side of the shade.
My window is 46" in height, so I marked a pin at 46.25" and pinned the velcro just above the "marking pin".
(Hubs makes a great hand model, hey?!)

Stitch down both sides of the velcro.

Trim the excess fabric down about 1/2" away from the velcro, as shown.
Attach the velcro on the shade to the velcro on the board.
If you're like me, you'll be getting very excited right about now! You're going down the home stretch!

Now you will need to measure out and predrill holes for the little circle screws.
Start by measuring in 2" on each end. Predrill. You want each of the screws to be roughly 10" apart, so in our case, we predrilled right in the middle of the board, and then again in the middle of the two "sections".
It should look something like this...
-->2"------->10"------->10"------->10"------->2"--

Screw in the circle screws.
They should be about 1/4" from the edge of the board that is closest to the shade.

Now it's time to pull it all together with your nylon cord.
Decide which side you want to have your cord drop (the side you want to pull the shade up) and start working on the opposite side of the shade. You will need to tie a bulky knot - and this is important because you don't want that knot eventually pulling through the loops on the tube tape. I usually knot it about three times, and then thread the cord through a large blunt needle.
So again - start at the bottom of the opposite side you want your cord drop.
Measure 2" in from the edge and pull your needle through a loop on the bottom row of tube tape.

This picture should give you a good idea of how you will need to thread your cording.
Continue measuring in 2" from the edge and work your way through all the rows of tube tape, then through the first circle screw and continue through all the other circle screws until you get to the opposite side. Cut your cord at roughly the halfway area on the opposite side of the shade. For example, my shade is 46" in length, so I cut the cord at 23".
Now go back and thread another row, starting 10" over from your first row. Thread it through the loops, measuring to make sure you're continuing in a straight line, thread through the circle screw and continue through the rest of the circle screws until you get to the opposite edge once more and again cut the cord at 23". Continue moving over until you have five rows threaded as shown in the picture above.

Now - just to make sure that knot doesn't come untied in the future (the nylon cord can be slippery), I like to stitch my knot together with a regular needle and thread. Just run some stitches through it all and eliminate a possible headache down the road.

Next, insert the dowels into the little pockets in the bottom of the tube tape. You may need to trim down the length of the dowels to fit neatly inside the tape, and that can easily be done with a utility knife.
Ta-da! The construction of your shade is finished!!
Now you just need to attach it to your window!
I hope you are very proud of yourself right now...you deserve a pat on the back!

You may want a couple extra helping hands at this point. It can get a little awkward for one.
Line up the shade edge of the board with the outside edge of your window casing, and predrill through the board and into the casing. We usually use three screws - one of each edge and one in the middle.
Screw the board to the casing.
At this point you can step back and see if the shade is hanging level, and if not, simply unscrew the board and adjust the shade by pulling apart the velcro and moving it however needed and then screwing it back up again. The beauty of it all is that the velcro side is sandwiched between the board and the casing so you will not be able to see any of the adjustments.

Now you need to determine where you would like your cleat.
In this case, we fastened it to the inside of the widow casing, but you could also fasten it to the wall beside the window. The choice is all yours!

Thread your nylon cording through the cord drop and tie a knot, then trim off the excess cording.

Guess what?! You're all done!
Pull your blind up and adjust the folds. I've found that it takes a few days to "train" the fabric to lie down into nice folds, especially if the fabric is thick and I've used a light blocking liner.

This shade cost me around $30 for all the material and supplies and it fits my window perfectly and the color and style is exactly what I want. That makes it all worth the effort for me and I have to say I'm hooked on making them.


Good luck and happy sewing!
I think you will soon be just as addicted to customizing your shades as I am!!
This morning as I was going through some new blog posts by various bloggers I follow, I spotted this beautiful shade over at Dear Lillie. Check it out! Gorgeous shades made from a drop cloth and then painted. What a fabulous idea...it definitely got my mind rolling again about further possibilities!
If you like it...
-----------------------------------------------


What a fantastic and thorough tutorial! My sister just made a pair of these for her bathroom! Yours look great!!! Hope you have a Wonderful Weekend! :)
ReplyDeleteVery nicely done! I always find it interesting to see how other people make their window treatments. I make my Roman shades a bit differently, but I really like this technique. I might have to give it a try on the next one I make!
ReplyDeleteWOW! Excellent instructions & pictures but it looks intimidating!! Why don't you just come over & make me one for my bathroom - I'll entertain your kiddos while you do it! Fair deal??? ;-)
ReplyDeleteI love the fabric you chose! I'll have to follow your tutorial and make one.
ReplyDeletewow, you did it again!!!! beautiful! Mo
ReplyDeleteThanks for this tutorial! I just love Roman shades!
ReplyDeleteThese are so awesome! I 'd love to make one! I just made a faux roman shade! I hope you'll link it up to my new linky party! I'm a new follower! Hope you'll stop by and follow along if you'd like!
ReplyDeleteMallory @ Classy Clutter
http://classyclutter.blogspot.com/2012/02/saturday-spotlight-2.html
Great tutorial! I would love to sew some roman shades for our living room. The curtains that were in the house when we bought it are nice and all, but they are a boring tan color, and I need something brighter! I think these would look fantastic.
ReplyDeleteAbsolutely beautiful. Great tutorial too.
ReplyDeleteFantastic and directions are so clear!! I have purchased a book of instructions in the past and yours are so much better to understand!! Thanks for taking the time to include your wonderful pictures to help the "visual learner".....me!!
ReplyDeleteWhat a great tutorial. Thanks so much for the clear directtions and many pictures.
ReplyDeleteI found your post through Amanda's Serenity Now blog and hope you'll visit me, too.
You really did provide a great tutorial. Very clear directions and pictures. I plan on sewing some roman shades for my craft/office room and this will come in very handy. I have pinned it so I will be able to reference easily. This is such a great post I've got my fingers crossed you'll share at Sunday's Best Party going on now. Many could benefit!
ReplyDeleteJust what I needed! I've been wanting to learn how to make these for our soon to be finished basement. Thanks for the awesome instructions.
ReplyDeleteWOW! You did an amazing job. I would love for you to stop by and link up at my linky party via: ourdelightfulhome.blogspot.com
ReplyDeleteMrs. Delightful
Ourdelightfulhome.blogspot.com
This is fabulous! Thanks for the tutorial and for linking up. It will be featured next week.
ReplyDeleteXO
Kristin
I like the board with hooks to hang the shades from. When I made a roman shade, I used velcro...lots of velcro!
ReplyDeleteFantastic tutorial and great photographs. I have wanted to make a roman shade and now have great instructions. Thanks. We have entries side by side at Very Merry Vintage!
ReplyDeleteThanks for the great tutorial, I'm going to give this a try. Your choice of fabric is fantastic . Thanks for sharing
ReplyDeleteI definitely want to try this. Thanks so much for sharing! Following you now. :)
ReplyDeleteYour shades look beautiful! Great tutorial too. I still don't think I could make one though...I am just horrible in math! LOL
ReplyDelete~Des
PS. I am now following you on Google....hope
you will follow me back :o)
Amazing! That is so perfect for your window. I've always been intimidated when thinking about trying to make one of these, but your tutorial is awesome. Maybe I'll try it some day (but I'm still a little scared!) ;)
ReplyDeleteWOW!
ReplyDeleteYou did an amazing job! Thank you for linking it up to the party!
I love roman shades! I will be doing this!
ReplyDeleteThank you so much for doing this! I've been wanting to make some of these from my windows and this helps soooo much! I just love roman shades, but they are so expensive to buy ready-made. Yours looks beautiful and so professional - great job!
ReplyDeleteKristen
Thank you so much. I am just taking a break from doing my.... curtain project. Your article has great suggestions and your curtain looks PERFECT.
ReplyDeleteCome link it up at our link party http://www.finecraftguild.com/party/
Our readers will want to see this!
Your tutorial is wonderful with clear instructions! Thank you so much for sharing your knowledge and creativity at Potpourri Friday!
ReplyDeleteThis is a fantastic tutorial and I am so excited to try it. I also had my eye on the roman shades at Dear Lillie, but I've been on the hunt for a tutorial for shades that were actually functional. Thanks for sharing!
ReplyDeleteGreat Tutorial. I want to make some for my room--but I am daunted at the fact that I need to make 4! Thanks so much for the clear directions, I love how they turned out.
ReplyDeleteAmy
www.11magnolialane.com
speaking from my vast experience (okay, two shades) this is a very very good tutorial. The only thing I would change is to use the little plastic rings instead of running the cord thru the tube tape (http://www.amazon.com/White-Plastic-Rings-Roman-Shades/dp/B004BFGPZE)
ReplyDeleteUsing velcro sounds great! I could change the fabric out when I get tired of it :-) Thanks for the great step-by-step photos.
This is a great tutorial. I am an experienced seamstress, but have not attempted roman shades because of the mounting board. Thanks for the boost that I needed to forge ahead!
ReplyDeleteThey look fantastic! I would love to make these.
ReplyDeletegreat tutorial! where did you get this fabric from?!?!
ReplyDeleteThose blinds look fantastic. Great job! I'm very impressed.
ReplyDeleteI have made roman shades several different ways. I have found when I use the tape that if often shows through the fabric so I eliminate the tape and just use the rings spaced evenly just like you would if you used tape. Your suggestion of using slats from a blind is a good one......I never would have thought of that. I also put a steel rod at the bottom of mine. I think the extra weight helps them to hang evenly. You did a fantastic job!
ReplyDeleteGreat tutorial -- thanks so much for sharing!
ReplyDeleteFound this on Pinterest and would love to try it out, thanks for the detailed tutorial!!
ReplyDeleteThis is amazing! Roman shades are absolutely ridiculously expensive to buy!! Fab tutorial!
ReplyDeleteCan you tell me how much it cost approximately to make the roman shade? (I realize it will be different depending on the size of the window, fabric... but just want to get an idea.)
ReplyDeleteHi Amy...sorry it's taken me a bit to get back to you. :(
DeleteYou're right...the cost really does vary according to fabric costs and window sizes. I have been able to make all my blinds for around $30 - $40 each BUT I have always come across fantastic sales at the fabric store and that has cut down on the cost a lot. My best advice would be to keep your eye on the sales and then pounce! :)
You are so KIND to have taken the time to make this tutorial and sharing it with us!!!! I SOOOOO can't wait to get new windows.. and as soon as I do.. I'll be trying this!!
ReplyDeleteI really hope you come over to The DIY Dreamer and share this.. Please :)
http://thediydreamer.blogspot.com/2012/02/from-dream-to-reality-linky-party-5.html
Quick question...my window is shorter than yours, when I measure and pin the tube tape I only have @4 inches of fabric left to the top. Do you recommend removing one row of tape, leaving me with 14 inches to the top on 4 rows or shorten the distance between each of the 5 rows.
ReplyDeleteHi there! I would definitely take out the top row of tape, leaving you with four rows and fourteen inches at the top. I'd love to see a pic when you've finished them! Have fun!!
DeleteThat's what I was thinking would be easiest. Thanks, can't wait to finish them!
DeleteThank you so much. I can't wait to start. I have been looking at buying shades for my huge windows but this will be so much better!!!
ReplyDeleteThanks so much for the tutorial! I followed step-by-step today and am so happy with the results! Of course, my window situation is a bit different since I have a metal door with a window in it that I wanted covered, so I fixed it a bit to hang from a curtain rod, and it still looks great! It seemed so daunting, but once I had the supplies (using my 40% off coupons at Joanns!) it took no time at all. Now onto my other 4 windows!
ReplyDeletePerfect tutorial! They came our perfect!
ReplyDeleteI you don't mind my asking, where did you get your fabric? I'm having a hard time finding chunky stripes in neutral colors!!
Thanks!!
Hi Katie! Thanks so much! :) I actually got my fabric in the drapery section at Fabricland. I think they are located only in Canada (not totally sure about that), but if you look at Fabric.com or Tonicliving.com, you might be able to find what you are looking for? I have trouble finding a good selection where I shop, so I have to resort to buying online at times and so far have been really happy with the results! Good luck! :)
DeleteIt is fantastic....How it's good for windows...I appreciate you share it.
ReplyDeleteRoman shades concord, ca
Thank you so much for this fantastic tutorial! Just finished two shades and they are perfect. Thanks for taking the time to show everything so clearly!
ReplyDeleteFabulous Tutorial. Your blinds came out beautifully. I can't wait to try it.
ReplyDeleteThanks
LOVE this tutorial! I love that the shades look like they're built to last and actually work! Have you ever used a cord lock pulley instead of a cleat to secure your shades? I'm considering making these for my kitchen and plan to raise and lower them every day. The cleat looks like a lot of work each day, and was considering using a cord lock pulley. Any thoughts? Thank you!
ReplyDeleteThis comment has been removed by a blog administrator.
ReplyDeleteOh my gosh thank you for this! Only problem is my window I want to put a roman shade on is only 35 inches tall. If I put the rows 8" apart and leave a good space at top there is only room for 3 rows. Is that enough? Should I make the rows closer and add one?
ReplyDeletethis is brilliant, thanks for sharing!
ReplyDeleteThanks for the great tutorial -- I was wondering what your recommendations are for an outside mount roman shade (I'm making them for a nursery and don't want any light peeking through the sides of the window!) Where would I attach the board?
ReplyDeleteHi there! Well, first you'll need to decide how far past the window casings you want your blind to go, then measure and cut accordingly, adding your seam allowances of course. Cut the board the same width and cover it, then rather than screwing it to the inside of the window casing, you can attach it to the wall above the window. That would be the most basic way of going about it, but I would think you could do a bit of research online and see if you can find some other ideas on how to dress it up a bit (maybe a valance?). Hopefully that makes sense...I can see what I mean in my mind's eye but I might not be conveying it very well!
DeleteGood luck and thanks for stopping by! :)
Love the pattern but am now to the point of sewing the velcro to the lining. Now, I am confused as to how the top above the velcro is finished. It looks like it is just cut off with unfinished edge. How is this hidden? Am I missing something?
ReplyDeleteHi there! Yes, the fabric edge above the velcro is an unfinished edge...it's hidden when it is attached to the board and the board is then fastened to the inside window casing...hopefully that makes sense. If you wanted a finished edge, however, it would be easy to fold the edges inside and top stitch it. Hope that helps! :)
ReplyDeleteThanks for this tutorial. I'm stuck on my first one and pretty overwhelmed... I'm having a hard time just getting my seams straight; I'm a super beginner. I've gotten to the point of finishing the seams and turning the fabric and lining right side out. My problem is I held it up to see if it's the right width and found that my basting and pinning left holes in the blackout lining and sunlight comes through :( Should I use a white paintmarker to cover the holes? And now I'm scared to remove the basting and make additional seams through both fabrics... could I just skip the outside seams? Would the shade still fold up appropriately?
ReplyDeleteHey there! Yikes, I feel your pain! I have run into this problem as well, where the holes are visible through the front fabric (in the sunlight)...seems like it can depend a bit on the fabric weight...lighter weight fabrics can show more, I think. Unfortunately the sun blocking liner is not very forgiving, is it? I don't think that the blind would fold up properly without being stitched together, but you could give it a try? The good thing, I've found, is that when the blind is raised, you can't see the pin/needle holes!
DeleteCan't thank you enough for the wonderful tutorial and pictures. My material order arrived last week and although patterns intimadate me,I was still going forward with the sewing. This clears it all up, beautifully. No patterns needed. Great!!! Thanks again.
ReplyDeleteREALLY excellent tutorial - I'll be using your instructions. I put off making these because I heard horror stories about using the plastic rings. Thank you for opening my eyes to tube tape.
ReplyDeleteI'm assuming that the folds are 4" so to answer questions that I had and other have about the length of their window - it seems that the length of the window - should be divided by 8 inches for 4" folds - so in my case - 56" I could use 5 sections of 4" folds - (40 inches) which would leave 16" which would leave 5" for the bottom and 11" for the top.
The fabric you chose is gorgeous!
Hi, thank you for the clear instructions on making the roman curtain. I have a question to ask. I don't understand what the velcro is for, can you please clarify? thanks!
ReplyDeleteThank you so much for this tutorial! I made these for my bay window and am in LOVE with the results!
ReplyDeletehttp://i47.tinypic.com/9zuatu.jpg
Hello,
ReplyDeleteThank you for this tutorial! I've been searching for a pattern, but they were all so unclear that I didn't think I could pull them off. All of your beautiful pictures and clear instructions made me feel confident enough to give it a try! I'm going to make 9 of them, so god help us all :)
Thank you! This is a great tutorial! I've been searching online for directions and ideas, but nothing has been so helpful. Your page is the one that has convince me to give it a try. Thank you so much!
ReplyDeleteThis is by far the most complete and easy to understand tutorial on roman shades I've read ... thanks so much for taking the time to document and write this post, I do know how much time this added to your project. I've made balloon shades before but this is my first roman blind; I'm so glad I read your post cause I was just going to modify my balloon shade process and now I realize how very wrong that would have been! My window is 66.5" long and wondered if you would recommend adding another row of tube tape for a total of 6 rows? Robin
ReplyDeleteGreat job, it turned out beautifully! Thanks for the tutorial, I'm going to attmept this tonight!
ReplyDeleteBest roman shade tutorial I've come across. Thank you! This is exactly what I've been looking for, for my new house. =)
ReplyDeleteThank you for this wonderful tutorial, I had a client ask me to make an embroidered piece I made for her into roman shades (I'm more of an embroidery artist than seamstress!) but your clear and wonderful directions made the final product outstanding. I would just add that if anyone is upholstering the board, to spray some adhesive so when you drill it doesn't rough up the fabric (whoops!) That may be common knowledge to some but it wasn't to me :) Thanks again, I'm excited to look further around your blog.
ReplyDeleteCan you show me how it looks with the shades down? I have the same mechanism that opens/closes your window and I want to see how it looks on top of it.
ReplyDeleteThanks for the tutorial....Have made three so far....two for our kitchen and one for our grandson-to-be...
ReplyDeleteI am bummed about the pinholes as well and am trying to figure out what I might be able to put on the backside of the blind to block them....I do like the tape as it gives me a straight sewing guide....any ideas out there????I may experiment with some scraps...white nail polish????
this tutorial is amazing! i've purchased my fabric, a wide black and white stripe, and i was curious what color thread you would suggest for when i sew the liner and shade fabrics together. i don't want to see an obvious white line going across the black stripes...
ReplyDeleteIt's taken me quite a bit of time (kids, life, old sewing machine, nervous because I'm a novice) but I finished my roman shade today and it's hanging in my son's room thanks to your instructions. Thanks!
ReplyDeleteThank you for this awesome tutorial. I spent the day making these, and they turned out better than I ever hoped. I had to make my own dowels with the table saw because the window I made them for is 59 inches wide and it is impossible to find 60 inch dowels. Overall, a fruitful way to spend a day! I'd post a photo but am not sure how to do so here.
ReplyDeleteThank you so much for this wonderful tutorial! Just followed it it make some gorgeous ones for our bedroom, replacing the custom ones that broke after the first 6 months... Thanks again!
ReplyDeleteThanks for the wonderful tutorial. Anne
ReplyDeleteThanks for the great tutorial-- just putting the finishing touches on shades for the two windows in the master bedroom. We're tired of being woken up at 6am by the sun shining through the blinds. I made the shades to go over the blinds, attaching the head board above the window. Next I'm making a cornice instead of valance. Thanks for the great instructions.
ReplyDeletePerfect instructions!!! And I'm excited to look further around your blog as well!!!
ReplyDeleteThis is a great tutorial! I just wondered how you clean them? I know they don't collect as much dust as the horizontal blinds, but they will need to be washed eventually. Is it possible to remove the wooden dowels and toss them in the washer or is the process much more extensive?
ReplyDeleteI just finished my very first Roman shade using your fantastic tutorial. In fact, I printed the tutorial out completely for future use. My shades look so nice, a professional could have made them. Thank you so much.
ReplyDeleteI have only one suggestion for your tutorial. One of my shades was 55 inches in length. Once the weight rod is in, it would have been very difficult to sew on the machine. Instead, I pinned each row completely making sure there were no puckers or folds and sewed each row to the front without putting the weight rod in. Much easier to sew. Then I opened the seam carefully on one side and put the weight rod in and hand stitched the opening closed using a ladder stitch. Worked perfectly.
Thanks again for helping my work look like it was special offers from a professional.