Thursday, 21 April 2011

Tardy for the Party!


There's been a very busy squawking, scolding, clucking hen around these parts for the last few weeks. Thankfully she finished laying all her eggs in time for me to decorate with them, but I'm afraid I missed every single Easter linky party out there in blog land. Boo.


These jute eggs are a complete and shameless copycat from Thrifty Decor Chick. But...I think she might have copycat-ed them from someone else...so it's all good. When I saw them on her site, I knew I HAD to make me some! And when I spotted packages of styrofoam eggs in the Dollar Store, I couldn't get my sticky fingers on them fast enough!


Of course in true Evie-fashion, I couldn't stop at one package...oh no! I had to get at least ten packs and five balls of twine! That's why my decor took so long in showing up.
These little stinks take for-EVER to wrap and glue!

(Be warned - if you try this at home - while the process is simple...wrap and glue your twine...you WILL burn your fingers silly with the glue gun. End. of. story.)

Then I thought I'd use up some curly willow twigs I had laying around. A few coats of off-white paint and I was almost happy with them.


I have generally always kind of turned my nose up at egg trees. So will someone please explain this next pic to me?


Maybe it's the third grade art project cherry blossoms...


I dunno...but whatever it was...I fell in love with it
and giggled almost the whole time while putting it all together. Huh?


Whatever the reason...this one is not being dismantled right after Easter.
I kinda sorta big fat heart it!


Happy Easter everyone!! Enjoy your dinners!
And don't forget the real reason of Easter!

Wednesday, 13 April 2011

Garlic Oil

I live in a fairly small prairie town. 
It's not very often I come across packages of peeled garlic cloves in the grocery store. Actually make that never. I only ever find them when I'm grocery shopping in someone else's town. But when I find 'em...I snap 'em up like nobody's (nobodies? spell check doesn't know) business.

Here's what I do with them....


Take some relatively decent olive oil and measure out about 1.5 cups. Pour it in a saucepan. Side note here - in no way am I claiming that this particular brand of olive oil is the bee's knees or the cat's meow or the be-all-end-all. But I KNOW it's not the worst one out there. I already bought the worst one out there and it tastes like tractor oil with toe jam mixed in. Or like I think tractor oil with toe jam mixed in would taste. So...if you're going to try this out for yourself...do yourself a favor and use a better-than-bottom-grade oil!


Next - pick out about 30 cloves of garlic and spread 'em out.


Them smush them with a quick slap on the back of a knife.


Pour them into the oil and heat over medium-low until the oil starts to bubble a little.


Turn the temperature down low enough that it keeps bubbling a little, but don't let it full out boil.
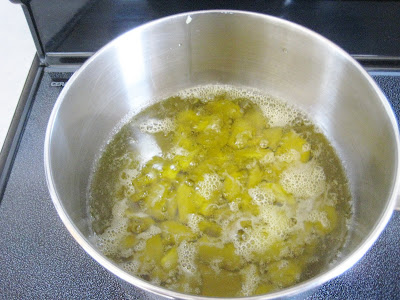
Cook for about 40 minutes or so until the garlic is nice and soft and smooshy.
Then pour the oil through a colander to strain out the nice and soft and smooshy garlic. Make sure you have a bowl under the colander!!! Duh.


Then go to your nearest dollar store and pick out the prettiest bottle you can find.
 I found ONE bottle in our town. It's not that pretty in my opinion, but it was the definitely prettiest one in town. Now you have to make sure that bottle is clean and dry. This is by far the hardest and most patience-wearing step in the process.


Then dig through all two of your drawers and a couple cupboards and look for your set of funnels. Rant and rave about how you can never find anything since you moved. Then your hubby will tell you to make a funnel out of aluminum foil. Marvel at his brilliance and realize once again why you married him.
Pour your lovely garlic oil into your pretty bottle and admire it for a while.


Now take the nice and soft and smooshy garlic cloves and put them in a mini food processor. I'm sure a blender would work just as well. Whip it up into a puree and put it into another nice jar that I forgot to tell you to buy at the dollar store earlier (sorry).


Now you have some very tasty oil and puree (store the puree in the fridge) that will add some really yummy flavor to anything that you want to add an extra kick of garlic to.


If you're anything like me, you'll put the oil in the cupboard and then completely forget that you have it.
BUT - if your brilliant hubby is anything like mine...he won't forget and he will use it every single time he cooks.
And then sing your praises for stocking the cupboard with such awesomeness.

Okay fine. I made that last part up.  

Monday, 11 April 2011

Happiness Is...


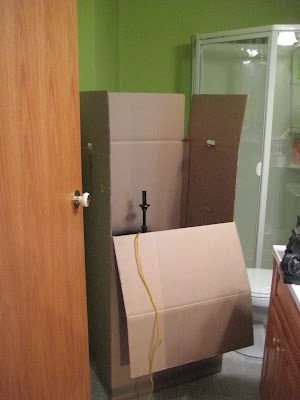
...figuring out a way to set up a spray painting booth inside when the weather is gorgeous right up until nap time. That's when the wind, snow and rain starts up and destroys any plans of painting outside!


I seem to be having a love affair with glossy black spray paint.
I can't get enough of it!


For anyone who was - don't worry - the "booth" is set up in a ventilated bathroom in the farthest corner of the house where we seldom go!

P.S. I take no blame or credit for the wall color in the bathroom!! Yikes!

Wednesday, 6 April 2011

I'm a Picture-Hanging Genius!!!

I have a sign that I love.
With two little kids, I really need this reminder around!
 Like...ALOT.


 This is the great spot I decided it need to go!
(Above the cabinets, not on the fridge with everything else)


Why would I choose an easy-to-access spot? That would be ridiculous, and totally out of the question!


That's when I got this fantastic idea!
I shudder to think of what genius ideas my kids might come up with after watching their mother.
See - I'm not really that tall. Here's the problem though...I'm not a Tori-Spelling-98lbs. either. One foot on that step ladder and all I could think of was the glass cracking and smashing up into lots of itty bitty pieces under me and me sitting on the floor with a very sore behind.


On to Plan B! My children are still completely bewildered at their mother.
On a different note - this could be a fantastic and very effective dieting method!


I am always extremely happy to let my hubby hang any pictures that have two nail-thingies. I just don't do tape measures and levels and all that junk. 
But right then I was totally bound and determined to get that sign up! Besides, we hadn't had breakfast yet and we were getting hungry! Somehow this idea miraculously popped into my head. (sometimes I wonder if I ever have an original idea at all)
I took a couple of those post-it tab thingeries and stuck them to the sign right smack dab in the middle of the nail-thingeries. The picture explains it better than me. Anyhow, once I had it centered on the wall (I may or may not have used a tape measure somewhat - okay very - sloppily just to see if everything was generally in the right place), I poked the nail tip through the tab flap that was sticking up. Then I measured from the hole in the tab down to the nail-thingerie. Then I measured down from the little hole in the wall and pounded in the nail. Does ANY of this make sense at all? Clearly I should never homeschool my children.
Well anyhow, it worked and I hung my very first two-nail picture while standing on my table!


Impressive, no? I strutted around the house like a peacock for about 15 minutes.
Then my whining, crying, hungry children forced me back to reality and I made breakfast.

About 5 minutes later, I somehow kneeled on something sharp but I managed to remember what the sign said in time and totally HELD MY TONGUE!
Someday I'm gonna get it.

Sunday, 3 April 2011

Eat Your Granola

Apparently Yogurt & Granola Time is my hubby's favorite part of his day. I'm really not sure whether to feel very sorry for him or...take it as a compliment...? Hmm.

He works a shift pretty typical to the oil field...eight days on and six days off. Those eight work days are looong days and he likes to have a lot of food with him and several choices available. So the day before he goes back on shift, the kitchen looks a little something like this...


Let me backtrack a little. When we first got married, I suggested the idea of making our own granola since the price of the store bought stuff caused me to do somewhat of a balking donkey-like performance at the grocery store. Well, let's just politely say that the idea didn't go over so well. But, my scheming friend and I came up with a plan! Mwahahaha! She made her own granola, and we were coming to stay with her and her hubby for a while. So if SHE served him HER homemade granola, he couldn't very well turn it down and still be polite, now could he?! Especially since she was MY long time friend (and ya gotta get in good with the long-time friends - everyone knows that). Well let's just say our devious little plan worked and I was now allowed to make our own granola, as long as I never, never, ever, ever strayed from her recipe. Umm, okay. If it's confession time, I'll have to admit that I did modify it a bit, but only to try to get closer to the flavor of the original store bought stuff that he had sworn allegiance to.

So here goes - maybe you can make your hubby a believer too.
(The full recipe is below)

Get the biggest bowl you own and throw in rolled oats (big flake oats produce a better result), wheat germ, oat bran, sliced almonds and shredded coconut. Mix it all up and do the macarena to make it really fun!


Turn your oven on. If you're anything like me, make sure nothing is hiding in there first!!

Now take a saucepan and throw in some maple syrup, honey, olive oil, cinnamon, vanilla and salt. If you measure your olive oil first, then your honey and maple syrup in the same cup, your life will continue to be happy. I usually pour the honey and maple syrup into the measuring cup at the same time. Heat this up until it's "thin", but don't let it come to a boil.
Now pour it over the dry stuff and stir it up. Spread it out over a foil lined cookie sheet. Actually, you need two fairly large cookie sheets and try to make sure the foil is shiny side down...otherwise you will end up with very crunchy, dark brown granola in not a good way.


Bake for 10 minutes, then take it out and stir it and bake again for another 10 minutes or so. Watch it fairly closely in the end and pull it out when it's the "brown-ness" that you like.

Let it cool for a few minutes, then pour back into the big, huge honkin bowl that you've since washed and dried. Wait for the next batch to bake, then throw that in too.

Here's where you can be creative! Add whatever dried fruit floats your boat. Or chocolate chips if you like! Make it your own. I used chopped apricots because that's the way hubby likes it. I used to add dried cranberries and after about a year, he very nicely told me he didn't really care for them. So...just dried apricots at this house.


If you keep them frozen, they are so much easier to chop. If you coat your knife with cooking spray first, it's even easier!


After all that...voila! Yummy, nummy granola.

Put it in a pretty jar and tie a ribbon around it! Or put it beside a vase of tulips and take a picture!


This jar typically lasts about a month. Unless my mom is visiting too...then maybe a week.
HA! HA! I'm teasing, Mom. I'm glad you like it!

So here's the full recipe.

Crunchy Granola from BC

8 cups rolled oats
1 cup wheat germ
1.5 cups oat bran
1 cup sliced almonds
1 small bag shredded coconut
1 tsp. salt
1/2 cup good quality maple syrup
1/2 cup honey
3/4 cup good quality olive oil
1 Tbsp. cinnamon
1 Tbsp. vanilla
1 cup chopped, dried apricots
(Sorry to be a stinker about it - I totally sound like Martha - but if you use "cheap" maple syrup and olive oil, it really makes a difference and does not taste very yummy in the end. Trust me - I tried it.)

Combine oats, wheat germ, oat bran, almonds and coconut in a large bowl and mix.
Heat oven to 325 F.
In a saucepan over medium heat, mix together: salt, maple syrup, honey, olive oil, cinnamon and vanilla. Heat and stir until mixed and "thin". Pour over oat mixture and stir to coat.
Line two cookie sheets with tin foil. Spread granola over sheet and bake for 10 minutes. Stir and bake for another 10 minutes or until a nice toasty, golden brown.
Cool. Stir in dried fruit(s). Store in an airtight container.

ENJOY!!!


Saturday, 2 April 2011

I (don't) Heart Organizing!

But every once in a while it's gotta be done.


See?
And look here - I don't just have a junk drawer! I have a junk dresser!
 (Mom or Dad - if you're reading this, you should probably just look away now.)


Before you judge too harshly - the wall paint is not our choice and we're switching out the batman hardware slowly but surely! I have big plans for this piece! But, for now, it's making an awesome junk dresser. (Sorry M&D!)

See?


I really, really (do not) heart organizing. I actually just get really, really excited about all the cute baskets and nifty little containers that I can buy in order to convince myself to try it!

There's just a wee tiny little problem. Whenever I'm trying to find something, I have to do it fast. My two little kiddos are pros at getting into anything and everything they can when Mommy's not looking. And looking for anything in a hurry and not being able to find it, put's this momma in a very grumpy mood.

So...I made a trip to one of our local dollar stores and found all of these...


(Maybe not so cute, but at least they all match!)

And after ONLY a week, it evolved into this...


and this...


No more missing bills! No more hunting for my hammer! Which, by the way, I purposely bought in a lovely floral pattern, so that my hubby would never, ever be tempted to steal it. It totally worked!!
Now I can even find my phone charger - along with the chargers from the last five cell phones!

I (don't) heart organizing, but I sure heart finding things fast!

And I'm pretty sure Telus hearts me for finding my overdue bill and paying it!

Related Posts Plugin for WordPress, Blogger...