Hey there, friends!
Tuesday was the last day of my hubby's three week "vacation"...and I say that loosely because there wasn't much relaxing going on. We purposely put our nose to the grindstone and dedicated the days to getting this place painted, as well as finishing up some other long-put-off job.
One of those put-off jobs was sewing up a roman shade for our bedroom.
I LOVE me some roman shades. If I could (and hopefully eventually I will), I would have them on every window in the house and do away with those dust collecting mini blinds forever.
The problem here lies solely in finding a good block of time where I can sit down uninterrupted and sew away. Our little renocation (I'm stealing the word from a friend cause I think it's brilliant) provided the perfect opportunity.
I thought while I was at it, I'd take pictures and write up with a "how-to" for any of you who might be interested in tackling some shades of your own.
Still with me?
Good.
There are a LOT of pictures...you've been pre-warned! When I learned how to make them, all I had was a bit of chicken scratching and a rough sketch to go by. I would have loved some really clear instructions, so I've tried to do my best here for you.
These shades are not difficult to make, they just require some time and patience.
And hey...in the end you'll have a beautiful custom shade that fits perfectly and matches exactly...for a fraction of the cost. Can't beat that, right?!
First you'll need to purchase your supplies - obviously!
Figure out the measurements of you window and make sure the fabric you choose is wide enough.
I typically buy 1.5 meters (roughly 1.7 yards) and I always have enough to cover a standard window.
- Drapery lining same amount as fabric (I usually use a light blocking liner)
- tube tape (width of window x 5)
- nylon cord (length + width + 1/2 length x 5...I explain this more below)
- 1.5" velcro
- cleat
- circle screws (5)
- cord drop
- slat (width of window)
- 1/4 " dowels (5 - width of window)
1" x 2" board (width of window)
- staple gun
- staples
If you've never heard of some of these items, don't worry, the pictures will better explain what you need to look for...keep reading!
First off, give your fabric a good ironing.
A crisp press makes a sewing project sooo much easier!
I always press both the fabric and lining.
Measure the width and height of the inside of your window where the shade will be hanging.
My window measured exactly 46" x 46".
Then, cut out your fabric adding 1/2" to each side and 4" to the length.
I cut my fabric out at 47" x 50".
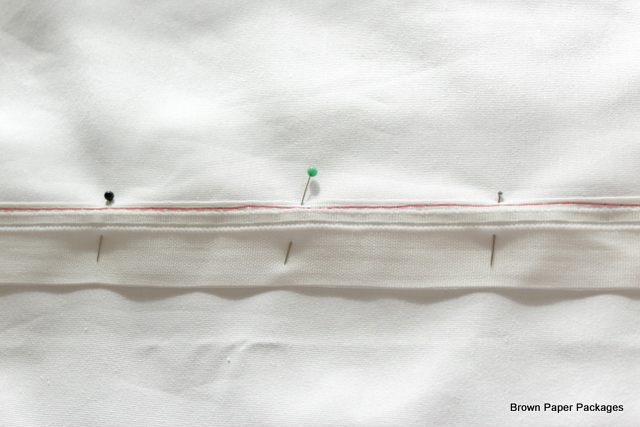
Now take your lining and mark out your measurements for the tube tape (show below) with pins.
The first row of tape should be 5 inches from the bottom. The next row should be 8 inches up and repeat with three more rows 8 inches apart.
Tube tape is a fantastic product that has little loops along the top of the tape for running nylon cord through (as shown above) and a pocket along the bottom (shown below) where you can insert a dowel. If you are still unsure of what you are looking for, ask for tube tape used for roman shades at your fabric store and they should hopefully know what you're looking for.
Now it's time to pin down the tube tape. Pin the tape to the right side of the lining and start at the bottom.
You have already measured out five inches and marked it with a pin. Pin your tape down with the bottom of the tape right above the marking pin (as shown above). Keep measuring as you pin your tape across the width of the lining, making sure you are keeping the tape straight.
Lay your next row of tape down, once again above the pin marking (refer to above photo).
As you work your way across, pinning the tape down, measure 8" from the top of the tape to the top of the tape below and you will be able to make sure you are continuing to pin in a straight line.
Continue laying out and pinning your rows of tape until you have five rows completed.
After my fifth row of tape, I had about 13" of fabric left. This is the way it should be!
You don't want to go too close to the top of your fabric or things will look very wonky when you're at the finishing stages!
Now baste your tape onto the lining. I used a bright colored thread in this tutorial for demonstration purposes, but you certainly don't have to. Just make sure when you are basting, that you stitch right along the top of the tape and avoid stitching over the little loops.
Now it's time to stitch the lining to the fabric!
Pin right sides together, and stitch the sides and bottom together with a 1/2" seam, leaving the top open.
Trim the bottom corners and flip right side out, making sure the corners are neatly pushed out. You're going to feel like a professional seamstress when you see your shade coming together!
Press the edges of the shade out flat.
Now you need to find a slat of some sort to push into the bottom of your shade.
I have used different materials for this with the various shades I've made. The main thing you need to look for when choosing a slat, is that it is sturdy yet slim. I have used gardening stakes before, but for this particular shade, Hubs had some plastic slats from an old mini blind hanging around, and it worked perfectly! It was flexible and yet wouldn't break - which is something you need to watch for if you use a wooden slat. If it is too thin, it can snap. I would say a 1/4" thickness would be perfect. The width of the slat should not be greater than 1.25".
Slide the slat between the fabric and lining down to the bottom of the shade.
Now you will need to stitch a pocket to keep the slat in place, which you can do either by hand or by machine. For this blind, I used a zipper foot and stitched with the machine. This is by far the most challenging step (if done by machine) as you need to make sure you are far enough away from the wall to accommodate the slat sticking out behind you and in front of you, as you stitch.
Stitching by hand will alleviate this problem, but it does take longer.
Time to stitch the tape again! This time you'll be stitching through all the fabric so make sure your top thread and bobbin thread match the fabrics! (Bobbin thread should match the shade fabric and top thread should match the lining.) Once again, pin the tape and fabric together, making sure everything is smooth and flat.
Now you will carefully stitch in the "ditch", as you can see in the above picture.
This will eliminate any chance of accidentally stitching the loops shut.
I suggest pinning and stitching one row at a time, removing the basting before continuing on to the next row.
This way you can be sure to pull the fabric smooth between each row and ensure a better finished product.
Now the shade part is complete! Yippee! You did it!
Give yourself a pat on the back!
Now you will need your 1" x 2" board - measured and cut to fit inside the width of the window (ours was 45.75"), dowels, circle screws, velcro, nylon cord and cord drop.
Using leftover fabric, "upholster" the 1" x 2" board. To be honest, this part is optional. The shade will work just fine without covering the board...it just won't look as nice!
At any rate, if you choose to cover it...wrap it much the same as you would wrap a gift...just use staples instead of tape!
Tuck those ends in and staple them neatly too!
Now staple the "hook" side of the velcro to one edge of the board.
In this example, we stapled the velcro right over the staples fastening the fabric underneath, so everything is neat and tidy.
Now you will need to stitch the "loop" part of the velcro to the lining side of the shade.
My window is 46" in height, so I marked a pin at 46.25" and pinned the velcro just above the "marking pin".
(Hubs makes a great hand model, hey?!)
Stitch down both sides of the velcro.
Trim the excess fabric down about 1/2" away from the velcro, as shown.
Attach the velcro on the shade to the velcro on the board.
If you're like me, you'll be getting very excited right about now! You're going down the home stretch!
Now you will need to measure out and predrill holes for the little circle screws.
Start by measuring in 2" on each end. Predrill. You want each of the screws to be roughly 10" apart, so in our case, we predrilled right in the middle of the board, and then again in the middle of the two "sections".
It should look something like this...
-->2"------->10"------->10"------->10"------->2"--
Screw in the circle screws.
They should be about 1/4" from the edge of the board that is closest to the shade.
Now it's time to pull it all together with your nylon cord.
Decide which side you want to have your cord drop (the side you want to pull the shade up) and start working on the opposite side of the shade. You will need to tie a bulky knot - and this is important because you don't want that knot eventually pulling through the loops on the tube tape. I usually knot it about three times, and then thread the cord through a large blunt needle.
So again - start at the bottom of the opposite side you want your cord drop.
Measure 2" in from the edge and pull your needle through a loop on the bottom row of tube tape.
This picture should give you a good idea of how you will need to thread your cording.
Continue measuring in 2" from the edge and work your way through all the rows of tube tape, then through the first circle screw and continue through all the other circle screws until you get to the opposite side. Cut your cord at roughly the halfway area on the opposite side of the shade. For example, my shade is 46" in length, so I cut the cord at 23".
Now go back and thread another row, starting 10" over from your first row. Thread it through the loops, measuring to make sure you're continuing in a straight line, thread through the circle screw and continue through the rest of the circle screws until you get to the opposite edge once more and again cut the cord at 23". Continue moving over until you have five rows threaded as shown in the picture above.
Now - just to make sure that knot doesn't come untied in the future (the nylon cord can be slippery), I like to stitch my knot together with a regular needle and thread. Just run some stitches through it all and eliminate a possible headache down the road.
Next, insert the dowels into the little pockets in the bottom of the tube tape. You may need to trim down the length of the dowels to fit neatly inside the tape, and that can easily be done with a utility knife.
Ta-da! The construction of your shade is finished!!
Now you just need to attach it to your window!
I hope you are very proud of yourself right now...you deserve a pat on the back!
You may want a couple extra helping hands at this point. It can get a little awkward for one.
Line up the shade edge of the board with the outside edge of your window casing, and predrill through the board and into the casing. We usually use three screws - one of each edge and one in the middle.
Screw the board to the casing.
At this point you can step back and see if the shade is hanging level, and if not, simply unscrew the board and adjust the shade by pulling apart the velcro and moving it however needed and then screwing it back up again. The beauty of it all is that the velcro side is sandwiched between the board and the casing so you will not be able to see any of the adjustments.
Now you need to determine where you would like your cleat.
In this case, we fastened it to the inside of the widow casing, but you could also fasten it to the wall beside the window. The choice is all yours!
Thread your nylon cording through the cord drop and tie a knot, then trim off the excess cording.
Guess what?! You're all done!
Pull your blind up and adjust the folds. I've found that it takes a few days to "train" the fabric to lie down into nice folds, especially if the fabric is thick and I've used a light blocking liner.
This shade cost me around $30 for all the material and supplies and it fits my window perfectly and the color and style is exactly what I want. That makes it all worth the effort for me and I have to say I'm hooked on making them.
Good luck and happy sewing!
I think you will soon be just as addicted to customizing your shades as I am!!
This morning as I was going through some new blog posts by various bloggers I follow, I spotted
this beautiful shade over at
Dear Lillie. Check it out! Gorgeous shades made from a drop cloth and then painted. What a fabulous idea...it definitely got my mind rolling again about further possibilities!
If you like it...
-----------------------------------------------


To see the other great parties I'm linking up to, click
HERE!


